The Magic Formula for Quick Knitted Top Apparel Consumption: A Practical Guide for New Merchandisers
In apparel marketing and merchandising, product consumption is one of the most crucial steps in costing. A small mistake in consumption can completely change the price of a garment — which means your costing may become inaccurate. For new merchandisers, this step often feels confusing and time-consuming.
But what if you could calculate consumption faster, easier, and more accurately?
Today, I’m sharing a magic technique I personally developed — a simple formula that helps merchandisers calculate garment consumption within minutes using only Length and Width. No complicated tools. No confusing measurements. Just a clean, beginner-friendly approach.
Why Length and Width Are Enough
Most merchandisers try to collect many measurements before calculating fabric consumption. But the truth is, for basic knitted garments (like T-shirts), you mainly need two parameters:
- Length
- Width
If you know how to adjust these measurements correctly, your consumption will be surprisingly accurate.
Let’s break down the formula step by step.
1. Understanding “Length” — What You Actually Need
When we say Length, it includes:
- Body Length
- Sleeve Length
But to make it usable in consumption, you must add proper sewing allowances and hem allowances.
✅ Body Length Formula
Body Length + 4 cm
Why add 4 cm?
- 1 cm Shoulder Sewing Allowance
- 3 cm Body Hem Allowance
If your hem width is 2 cm, you must fold it once (2 cm) and give seam on top.
An additional 1 cm is kept as sewing allowance.
So total hem addition = 2 cm + 1 cm = 3 cm
✅ Sleeve Length Formula
Sleeve Length + 4 cm
Why add 4 cm?
- 1 cm Sleeve Join Sewing Allowance
- 2 cm Sleeve Hem Fold + 1 cm Stitch Allowance
Again, hem width is typically 2 cm, plus 1 cm sewing allowance, totaling 3 cm.
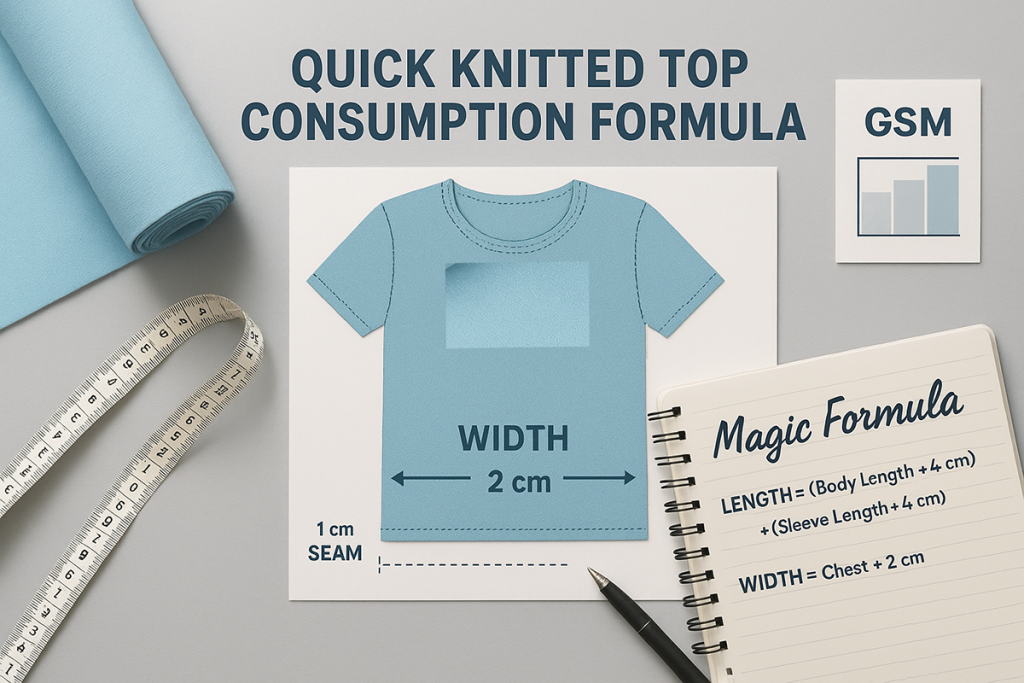
2. Understanding “Width” — The Simplest Part
“Width” refers to the Chest Measurement.
For consumption calculation:
Final Width = Chest Measurement + 2 cm
Why add only 2 cm?
Because:
- Left side seam → 1 cm sewing allowance
- Right side seam → 1 cm sewing allowance
✅ Total sewing allowance = 2 cm
This allowance ensures the garment is stitched comfortably without becoming tight after sewing.
3. Final Magic Formula
To summarize, here’s the quick formula you can use anytime:
Length = {(Body Length + 4 cm) + (Sleeve Length + 4 cm)}
Width = (Chest + 2 cm)
If you have these two, you can easily calculate fabric consumption in GSM-based formula or marker width method.
Understanding the Full Consumption Formula
Now that we have calculated the Length and Width, let’s apply the complete consumption formula used in the apparel industry:
Consumption (kg/pc) = ( Length × Width × 2 × GSM × 12 ) / 10,000,000 + Wastage %
✅ Why “2” is used in the formula?
Because a T-shirt has two fabric panels:
- Front part
- Back part
So we multiply the area by 2 to cover both pieces.
✅ What is GSM?
GSM stands for Grams Per Square Meter — the weight of fabric per square meter.
Higher GSM means heavier/thicker fabric; lower GSM means lighter fabric.
✅ Why “× 12”?
Because:
- 1 dozen = 12 pieces
If consumption per piece is known, multiplying by 12 directly converts it into dozen consumption, which buyers and factories frequently use for:
- Bulk costing
- Order budgeting
- Fabric booking
✅ Why divide by 10,000,000?
Because:
- Length and width are in centimeters
- GSM is in grams
- Final output needs to be in kilograms
✅ The number 10,000,000 converts:
- cm² → m²
- grams → kilograms
This is a standard unit-conversion factor used globally in garment costing.
✅ Understanding Wastage — Why It’s Necessary
Wastage is unavoidable in garment production. Even with perfect planning, the final actual shipment quantity is always slightly less than the quantity cut. That’s why we must add a wastage percentage to the consumption.
1. Cutting Wastage
Cutting tables always generate wastage because:
- Fabric is cut from a tubular roll, so the GSM measured at dyeing may slightly change
- Some fabric is unusable from the roll head or tail
- Many small fabric scraps are created
- Sometimes fabric rejection happens and replacement cutting is needed
2. Sewing Wastage
During sewing:
- Alterations may be needed
- Some panels can be rejected
- Stitching mistakes create extra wastage
3. Finishing Wastage
In finishing:
- Panels shrink
- Stains or defects appear
- Some garments fail final inspection
Final Reason for Adding Wastage
A garment is made by many people across many departments — cutting, sewing, finishing, QC, packing.
So the total output is never equal to the total cutting quantity.
For safe and accurate costing, wastage must always be added.
Conclusion
This magic technique makes consumption calculation faster, easier, and more accurate for new merchandisers. With only Length, Width, GSM, and a standard wastage %, you can confidently calculate fabric consumption — even during quick buyer meetings.
💬 0 Comments
💭 Share your thoughts