Knit fabric making process step by step for beginner apparel merchandiser
Introduction
If you are new in apparel merchandising, understanding how knit fabric is made is very important. Knit fabric is used in T-shirts, sweatshirts, and many other clothes. Knowing the process helps you work better with factories and buyers.
Without the right fabric, even the best design cannot become a quality garment. That’s why understanding the knit fabric making process is essential.
This guide will explain the knit fabric making process in simple steps. You will learn what happens from yarn to finished fabric.
Yarn selection – The foundation of knit fabric
Every knit fabric starts with yarn. Choosing the right yarn is like selecting the right ingredients for a recipe. Yarn selection depends on the fabric’s GSM and composition. For knit fabric, the yarn type and thickness decide how the fabric will feel and perform.
In a factory example:
A buyer orders 5000 pieces of T-shirts in 100% cotton, 160 GSM, single jersey. The merchandiser confirms that the yarn should be 100% cotton combed, 28/1 count for softness and lightweight feel.
Key things you check as a merchandiser:
- Fiber type: Cotton, polyester, viscose, blends
- Yarn count: Thinner yarn for lightweight fabric, thicker yarn for heavier fabric
- Quality: Combed, carded, OE (Open End)
- The higher the yarn count, the thinner the fabric will be. The lower the yarn count, the thicker the fabric will be.
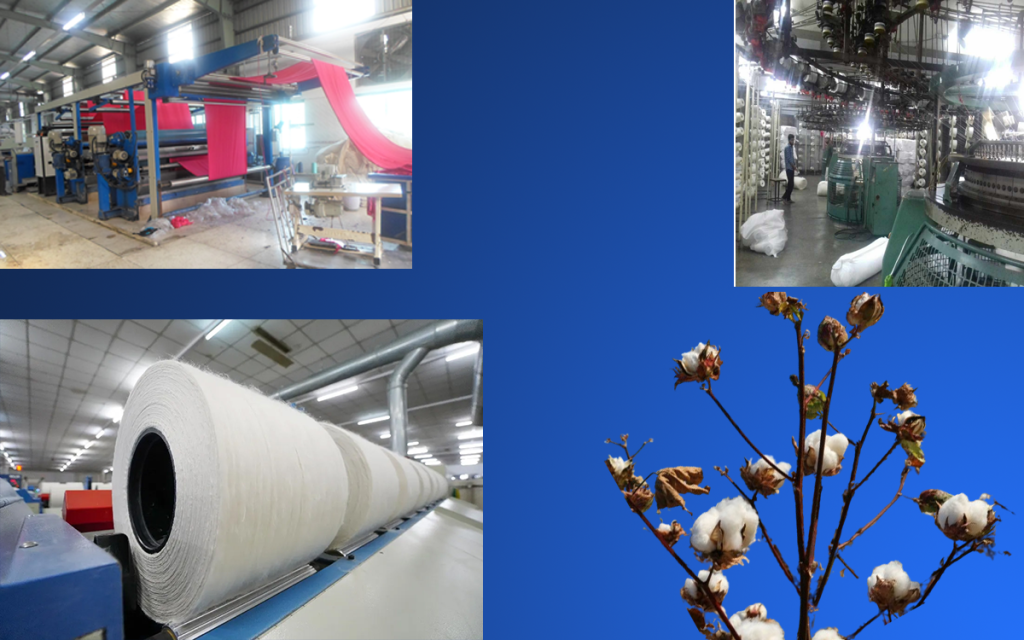
Knitting – Turning yarn into fabric
Once yarn is ready, it goes to knitting machines. Knitting is the process where needles loop the yarn to make fabric.
Two common types of knitting machines:
- Circular knitting machine → Used for T-shirts, polo shirts, leggings
- Flat knitting machine → Used for collars, cuffs, sweaters
Tip: Always keep a knitting program sheet with details like yarn count, GSM, and structure (single jersey, rib, interlock).
Greige fabric inspection – The first quality gate
Greige fabric means fabric just knitted, not dyed or finished.
Common knitting faults:
- Hole
- Needle lines
- Oil stains from the machine
In the factory:
A merchandiser checks the 4-point system inspection report before sending fabric to the dyeing section. This ensures faulty rolls are separated early.
Dyeing – Adding color
Dyeing transforms dull greige fabric into vibrant material.
The dyeing process depends on fiber type:
- Cotton → Reactive dye
- Polyester → Disperse dye
- Blends → Double dyeing process
Practical tip:
If the buyer requests “Navy Blue”, the merchandiser must send lab dips (small dyed fabric samples) for approval before bulk dyeing.
In the factory example:
A bulk dyeing machine can dye 500–800 kg fabric at once. Merchandiser tracks shade approval, shade variation, and shrinkage %.
Finishing – making fabric ready for garment cutting
After dyeing, the fabric is still rough. Finishing improves softness, stability, and appearance.
Common finishing processes:
- Stander → Set the fabric width to the correct size by stretching it evenly.
- Compacting → Controls shrinkage
- Brushing → Adds a soft, fluffy feel
Real-world check:
The merchandiser gets a finished fabric swatch to measure GSM, width, and hand feel. If it matches the buyer’s spec sheet, the fabric is approved for cutting.
Final fabric inspection & approval
Before sending fabric to the garment cutting section, final inspection is done.
What you check:
- GSM within tolerance (+/- 5%)
- Fabric width matches order
- No major defects
- Shade matching across rolls
Factory example:
If 100 rolls are delivered, 10% are randomly inspected. Any rolls failing inspection are sent for reprocessing.
Step-by-step quick view for merchandisers
- Yarn selection – Choose fiber type, count, and quality
- Knitting – Yarn to fabric on machines
- Greige inspection – Check for knitting faults
- Dyeing – Add required color
- Finishing – Improve softness, control shrinkage
- Final inspection – Approve for garment cutting
Practical tips for beginner merchandisers
- Keep fabric test reports (GSM, shrinkage, color fastness) in your file
- Visit the knitting and dyeing section to learn machine capabilities
- Always confirm shrinkage and GSM before cutting to avoid garment fitting issues
- Maintain clear communication with suppliers for on-time delivery
Why this process matters
As a merchandiser, you are the bridge between buyer and factory. If you understand the knit fabric making process, you can:
- Solve problems faster
- Avoid costly mistakes
- Deliver on time with quality
Conclusion
The knit fabric making process step by step is not just a technical journey—it’s the backbone of the apparel industry. From yarn selection to final inspection, every stage needs attention. As a beginner merchandiser, if you master these steps, you will be more confident in handling buyer requirements and factory production.
💬 0 Comments
💭 Share your thoughts